
Parental Note: This experiment is geared towards ages 10 and up. The project will require the use of scissors while cutting plastic bottles, using a hammer and nail, and a hot glue gun. Some parental help may be required for these steps.
Experiment Overview:
Did you know that wind is a type of renewable energy? Wind is constantly being produced by the earth’s rotation and the uneven heating of the earth’s surface. In fact, as long as the earth rotates and the sun shines, we will have wind!
The amazing thing about wind is that it can be turned into electricity through the use of a wind turbine. A wind turbine is a tall, sturdy structure with large blades that are moved by the wind. Those blades are connected to a drive shaft, which is attached to a generator, to collect and distribute the clean energy produced.
You can create your own wind turbine with your family through the use of items found around the home. This project will focus on the major parts of a wind turbine and how they work.
Experiment Materials:
- Dowel Rod (any size)
- (2) 8” Wooden skewers
- Hammer and one large nail
- (1) Hot glue gun and (1) glue stick
- Marker
- (4) 8 oz plastic water bottles
- Masking tape
- Empty thread spool
Experiment Process:

Step 1
The first step in this experiment is to take off all the caps from your plastic bottles. Use a large nail to tap a hole into the center of each bottle cap. You should do this to all 4 of the plastic bottle caps. Place the caps back on the bottles. You may need help from an adult on this step.
Step 2
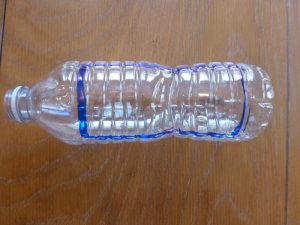
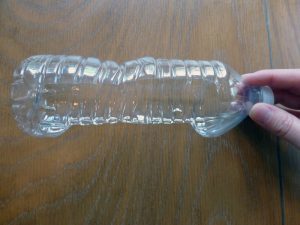
You will be creating the blades for your wind turbine in this step. Use a marker and draw a rectangle on one side of your plastic bottle. Make sure to keep the end and the neck of the bottle intact (this rectangular shape will be used as your cutting line). Use your scissors to cut the rectangular section out of the middle of your bottle. Repeat this step for all 4 plastic bottles. You may need help from an adult on this step.

Step 3
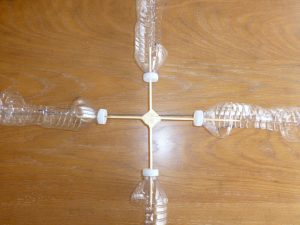
Using the small holes you nailed into your plastic bottle caps, place the bottles on the ends of the wooden skewers making sure a small part of the skewer pokes through the top of the bottle cap. You should now have two skewers with plastic bottles on both ends. You have successfully created the blades for your spinning turbine!
Step 4
Tape the two skewers with the bottles on each end in a “+” pattern. You are taping the two skewers together in the middle.
Step 5
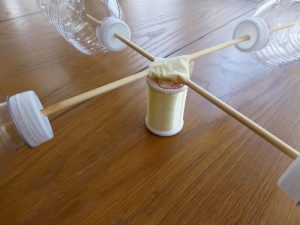
Hot glue the center of your blades (the taped section) to the top of your thread spool. You may need help from an adult on this step.
Step 6
Place a dowel rod into the opposite end of your thread spool. This step will allow the blades to spin. Align your ‘cut-out’ rectangles to face the same way.
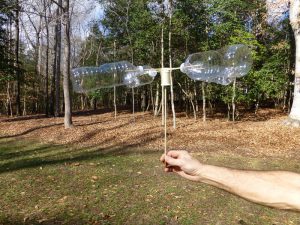
Step 7
Go outside and hold your wind turbine up high, and let the wind ‘spin’ it. If there is no wind to move your turbine, you can use a small fan or a breath of air.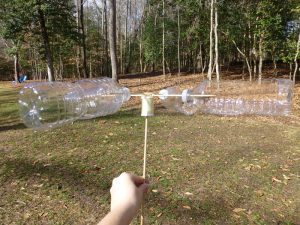
Conclusions:
As we finish our wind turbine, let’s take a minute to review the important parts.
- Blades that catch the wind (the plastic bottles)
- A spinning base (the thread spool)
- A shaft to connect to the generator (our dowel rod)
Great job creating your own wind turbine. I challenge you to go out and create your own unique wind turbine with items found around your house. Make sure to incorporate all the important parts needed to make a wind turbine!
Study Questions
- What are the major elements needed to create a wind turbine?
- How does a wind turbine work?
- What items from your home could you use to create a wind turbine of your own?
- How could you use a wind turbine in the real world? Where do you think you would find a wind turbine?
- Do you think the size of the wind turbine makes a difference in how much electricity is produced?
Extension:
Parents, feel free to try these different variations for younger children.
- Create a pinwheel using paper, a pencil, and a push pin (age 8, with adult help
- Create a windmill design. Try an oatmeal container as the base and popsicle stick with construction paper as the blades. (age 8-9)

")

Want to learn more about Community Solar?
Our solar specialists can provide a free consultation.
Get Started